[K8S] Phần 8 - Monitoring trên Kubernetes Cluster dùng Prometheus và Grafana
This post hasn't been updated for 2 years
Lời tựa
Chào các bạn, hôm nay chúng ta sẽ đến với một topic khá hot khi làm việc với Kubernetes đó là Monitoring, cụ thể hơn là Prometheus và Grafana - Cái mà hầu như ai làm với K8S sẽ đều phải va chạm với nó  Trong phần 5 của series này mình có giới thiệu về Metrics Server, nó cũng giúp theo dõi được Performance của các thành phần của K8S nhưng nó không phổ biến, hoặc nói một cách thực tế là không ai dùng nó để monitor hệ thống cả (tham khảo: https://viblo.asia/p/k8s-phan-5-metrics-server-cho-k8s-va-demo-hpa-oOVlYRwz58W)
Nếu các bạn có để ý các bài tuyển dụng của các công ty thì nó thường yêu cầu luôn trong phần kinh nghiệm về Monitoring là phải làm việc với Prometheus và Grafana rồi. Thô nhưng thật, vì mình thấy nó như một cái must-have với những ai làm việc với K8S.
Giới thiệu
Prometheus và Grafana là các phần mềm Open-Source, các bạn hoàn toàn có thể cài nó trên k8s, cài trên Docker hoặc trên OS service đều được cả. Trong phạm vi bài viết này mình sẽ giới thiệu sơ qua về Prometheus/Grafana và cách cài đặt nó lên Kubernetes Cluster.
Prometheus là gì
Prometheus là một phần mềm giám sát mã nguồn mở, và đang trở nên ngày một phổ biến hơn. Prometheus rất mạnh và lại đặc biệt phù hợp để dùng cho việc giám sát các dịch vụ trên Kubernetes vì nó hỗ trợ sẵn rất nhiều các bộ template giám sát với các service opensource, giúp việc triển khai và cấu hình giám sát nhanh chóng và hiệu quả. Đi kèm với Prometheus (đóng vai trò giám sát) thì cần có thêm Alart Manager (đóng vai trò cảnh báo) để người quản trị có thể phát hiện được một vấn đề xảy ra sớm nhất có thể.
Kiến trúc của Prometheus
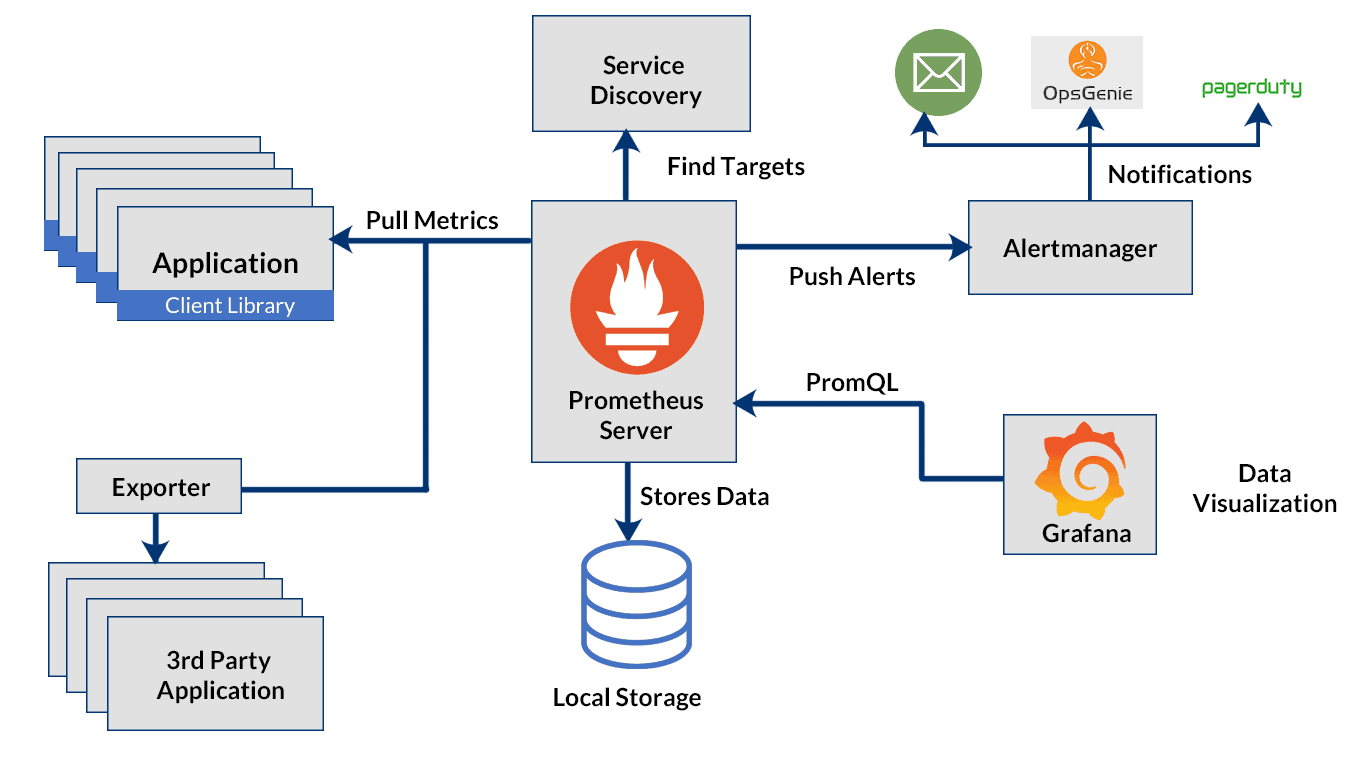
Thành phần chính của Prometheus được gọi là Prometheus Server gồm các thành phần có nhiệm vụ:
- Time Series Database là nơi lưu trữ thông tin metrics của các đối tượng được giám sát
- Data Retrieval Worker có nhiệm vụ lấy tất cả thông tin metric từ các đối tượng được giám sát như server, services, ứng dụng.. và lưu vào database
- HTTP Server API là nơi tiếp nhận các truy vấn lấy dữ liệu được lưu ở DB, nó được sử dụng để hiển thị dữ liệu lên dashboard.
![image.png]()
Cách thức hoạt động của Prometheus trên Kubernetes
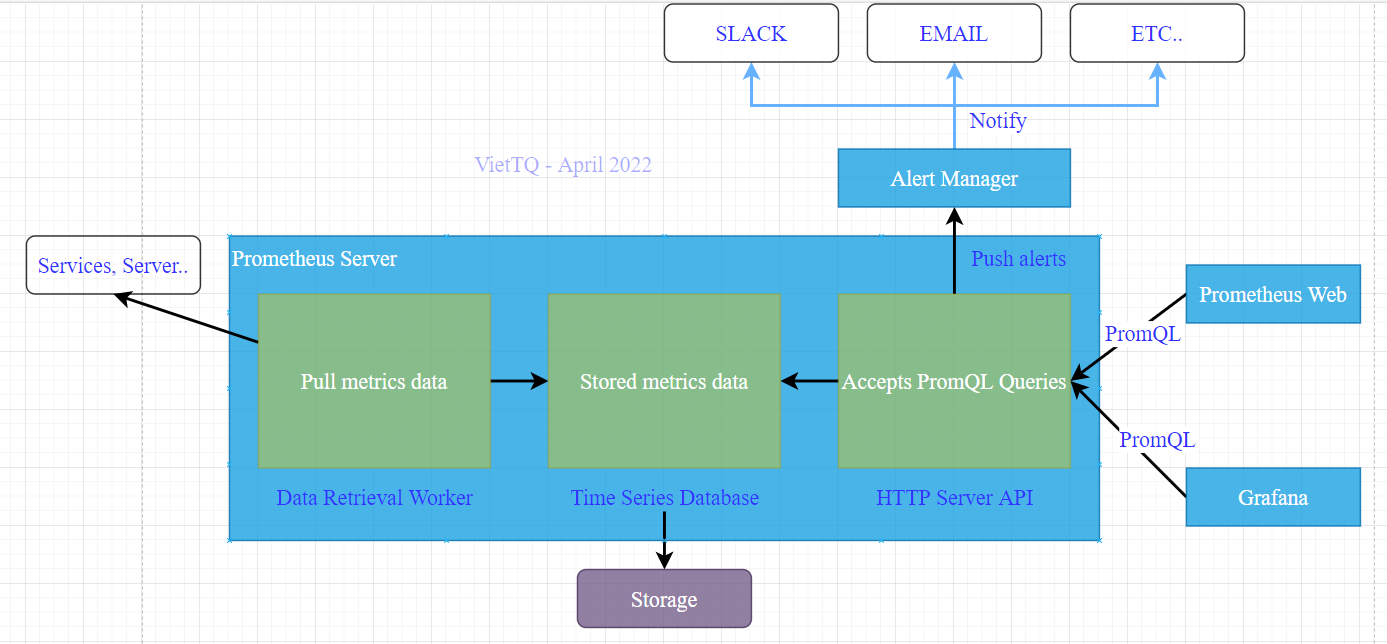
Cách thức hoạt động của Prometheus khá trong sáng. Nó sẽ định kỳ lấy các thông tin metrics từ các "target, lưu thông tin metric đó và DB. HTTP API Server thực hiện lắng nghe các request từ client (ví dụ Prometheus Dashboard hay Grafana) để lấy thông tin từ DB và trả về kết quả cho client hiển thị lên dashboard.
Prometheus cho phép bạn cấu hình các quy tắc sinh cảnh báo (rule), khi các giá trị thỏa mãn các điều kiện đó thì cảnh báo sẽ được sinh ra và gửi tới Alert Manager. Tại Alert Manager sẽ tiếp tục là nơi xử lý gửi cảnh báo tới các nơi nhận, gọi là "receiver", ví dụ như Email, Telegram...
Cấu hình hoạt động của Prometheus gồm các tham số chính:
- global: Các tham số chung về hoạt động của Prometheus, ví dụ là khoảng thời gian định kì pull dữ liệu metric về chẳng hạn
- alerting: Thông tin kết nối tới Alert Manager. Bạn có thể cấu hình một hoặc nhiều Alert Manager tùy vào mục đích sử dụng.
- rule_files: Đây là phần quan trọng trong xử lý các báo. Rule file quy định các điều kiện để sinh ra một cảnh báo từ thông tin metric đầu vào. Ví dụ đặt rule RAM của Node > 80% thì đặt cảnh báo cao tải RAM.
- scrape_configs: Đây là phần cấu hình liên quan tới kết nối tới các target để lấy metric. Ví dụ bạn cần lấy performance của các K8S Node, và lấy thêm metric của database đang được cài trên K8S chẳng hạn thì bạn cần cài 2 exporter cho 2 target trên, và cấu hình scrape_configs để lấy thông tin từ exporter đó export ra.
Grafana là gì
Grafana là phần mềm open-source dùng để phân tích và hiển thị trực quan dữ liệu. Nó giúp việc xử lý hiển thị dữ liệu trên các dashboard với khả năng tùy biến hoàn hảo, hỗ trợ rất lớn cho việc theo dõi phân tích dữ liệu theo thời gian. Nó lấy nguồn dữ liệu từ nguồn như Prometheus, Graphite hay ElasticSearch..
Hiểu đơn giản thì Prometheus làm nhiệm vụ cặm cụi lấy thông tin hệ thống, Grafana thì kết nối với Prometheus để lấy dữ liệu và hiện thị lên một cách gọn gàng đẹp đẽ và long lanh nhất 
Các tính năng chính của Grafana
- Dashboard Đây là tính năng "đỉnh" nhất của Grafana với rất nhiều tùy biến cũng như hệ thống template cực kỳ đa dạng giúp việc hiển thị dữ liệu trở nên sinh động, trực quan.
- Alerts: Việc đặt ngưỡng cảnh có thể được thực hiện ở Grafana (tương tự cấu hình rule ở Alert Manager vậy).
- Native Support: Được hỗ trợ naitive từ rất nhiều database phổ biến như MySQL, Postgres..
- Built-in Support: Hỗ trợ sẵn các datasource đối với Prometheus, Influx DB, CloudWatch, Graphite, ElasticSearch.
Cài đặt Prometheus và Grafana trên K8S bằng Helm
Nhắc lại một chút trong series bài viết này mình dựng lab K8S gồm 03 Master và 03 Worker. Mình sử dụng 1 node để cài CICD (vtq-cicd) và đồng thời dùng nó là nơi lưu các cấu hình cài đặt các phần mềm lên K8S để dễ quản lý.
Trong bộ cài mình giới thiệu dưới đây đã bao gồm sẵn cả bộ công cụ gồm Prometheus, Alert Manager và Grafana luôn, rất tiện dùng và cài đặt cực kỳ đơn giản.
Mình sẽ cài đặt theo các bước:
- Tải helm-chart về
- Tạo file config và tùy biến các tham số cấu hình:
- Đổi pass login mặc định
- Cấu hình ingress cho Alert Manager
- Cấu hình ingress cho Grafana
- Cấu hình ingress cho Prometheus
- Cài đặt, kiểm tra kết nối lấy dữ liệu metric trên dashboard
Bắt đầu vào cài đặt thôi!
Trước hết tạo thư mục để chứa file cấu hình cài đặt Prometheus:
cd /home/sysadmin/kubernetes_installation/
mkdir prometheus
cd prometheus
Khai báo repo của Helm và download helm-chart của Prometheus về:
[sysadmin@vtq-cicd prometheus]$ helm repo add prometheus-community https://prometheus-community.github.io/helm-charts
[sysadmin@vtq-cicd prometheus]$ helm repo add stable https://charts.helm.sh/stable
[sysadmin@vtq-cicd prometheus]$ helm repo update
[sysadmin@vtq-cicd prometheus]$ helm search repo prometheus |egrep "stack|CHART"
NAME                                                    CHART VERSION   APP VERSION     DESCRIPTION
prometheus-community/kube-prometheus-stack              34.9.0          0.55.0          kube-prometheus-stack collects Kubernetes manif...
prometheus-community/prometheus-stackdriver-exp...      2.2.0           0.12.0          Stackdriver exporter for Prometheus
stable/stackdriver-exporter                             1.3.2           0.6.0           DEPRECATED - Stackdriver exporter for Prometheus
[sysadmin@vtq-cicd prometheus]$ helm pull prometheus-community/kube-prometheus-stack --version 34.9.0
[sysadmin@vtq-cicd prometheus]$ tar -xzf kube-prometheus-stack-34.9.0.tgz
[sysadmin@vtq-cicd prometheus]$ cp kube-prometheus-stack/values.yaml values-prometheus.yaml
Giờ thì ngó qua file values mặc định của bộ helm-chart này sẽ thấy nó đã mặc định cấu hình Rule cho các thành phần của K8S từ etcd, kube-api.. Và Alert Manager cũng dc cài mặc định trong bộ này luôn.
defaultRules:
  create: true
  rules:
    alertmanager: true
    etcd: true
    configReloaders: true
    general: true
    k8s: true
    kubeApiserver: true
    kubeApiserverAvailability: true
    kubeApiserverSlos: true
    kubelet: true
    kubeProxy: true
    kubePrometheusGeneral: true
    kubePrometheusNodeRecording: true
    kubernetesApps: true
    kubernetesResources: true
    kubernetesStorage: true
    kubernetesSystem: true
    kubeScheduler: true
    kubeStateMetrics: true
    network: true
    node: true
    nodeExporterAlerting: true
    nodeExporterRecording: true
    prometheus: true
    prometheusOperator: true
Và Alert Manager cũng dc cài mặc định trong bộ này luôn, nếu bạn không muốn cài chung trong bộ này thì có thể sửa enabled: false để tự cài Alert Manager và cấu hình tích hợp với Prometheus sau. Mình thì dùng luôn đỡ mất công cấu hình:
alertmanager:

  ## Deploy alertmanager
  ##
  enabled: true

  ## Annotations for Alertmanager
  ##
  annotations: {}

  ## Api that prometheus will use to communicate with alertmanager. Possible values are v1, v2
  ##
  apiVersion: v2
Cấu hình tạo ingress cho Alert Manager để kết nối từ bên ngoài vào bằng hostname là alertmanager.monitor.viettq.com
   ingress:
     enabled: true
     hosts:
        - alertmanager.monitor.viettq.com
      ## Paths to use for ingress rules - one path should match the alertmanagerSpec.routePrefix
      ##
     paths:
      - /
Đổi password mặc định khi login và web Grafana theo ý của bạn, ở đây mình đặt là "Viettq@123":
adminPassword: Viettq@123
Cấu hình ingress cho Grafana để kết nối vào từ bên ngoài qua hostname grafana.monitor.viettq.com
    ingress:
      ## If true, Grafana Ingress will be created
      enabled: true
      hosts:
       - grafana.monitor.viettq.com
      #hosts: []

      ## Path for grafana ingress
      path: /
Cấu hình ingress cho Prometheus để kết nối vào từ bên ngoài qua hostname prometheus.monitor.viettq.com
   ingress:
     enabled: true
     hosts:
       - prometheus.monitor.viettq.com
     #hosts: []

      ## Paths to use for ingress rules - one path should match the prometheusSpec.routePrefix
      ##
     paths:
      - /
Do mình sẽ espose các ứng dụng này qua Nginx-Ingress nên tất cả các cấu hình service mình sẽ để mặc định là loại clusterIP.
Mình có viết hướng dẫn chi tiết cách cài và sử dụng Nginx-Ingress ở phần 6 trong series này, các bạn có thể tham khảo tại đây: https://viblo.asia/p/k8s-phan-6-load-balancing-tren-kubernetes-dung-haproxy-va-nginx-ingress-4dbZNRpaZYM
Sau khi tùy biến file values.yaml rồi thì ta thực hiện cài đặt lên:
[sysadmin@vtq-cicd prometheus]$ kubectl create ns monitoring
[sysadmin@vtq-cicd prometheus]$ helm -n monitoring install prometheus-grafana-stack -f values-prometheus-clusterIP.yaml kube-prometheus-stack
NAME: prometheus-grafana-stack
LAST DEPLOYED: Mon Apr 18 04:12:53 2022
NAMESPACE: monitoring
STATUS: deployed
REVISION: 1
NOTES:
kube-prometheus-stack has been installed. Check its status by running:
  kubectl --namespace monitoring get pods -l "release=prometheus-grafana-stack"

Visit https://github.com/prometheus-operator/kube-prometheus for instructions on how to create & configure Alertmanager and Prometheus instances using the Operator.
Kiểm tra kêt quả cài đặt:
[sysadmin@vtq-cicd prometheus]$ kubectl -n monitoring get all
NAME                                                               READY   STATUS    RESTARTS   AGE
pod/alertmanager-prometheus-grafana-stack-k-alertmanager-0         2/2     Running   0          14m
pod/prometheus-grafana-stack-698c69b75c-fmbkt                      3/3     Running   0          6m17s
pod/prometheus-grafana-stack-k-operator-7db87bb89d-2tqbb           1/1     Running   0          6m34s
pod/prometheus-grafana-stack-kube-state-metrics-5bc94b47cb-2qgps   1/1     Running   0          5m54s
pod/prometheus-grafana-stack-prometheus-node-exporter-8pbjw        1/1     Running   0          14m
pod/prometheus-grafana-stack-prometheus-node-exporter-cmcbz        1/1     Running   0          14m
pod/prometheus-grafana-stack-prometheus-node-exporter-jhjmz        1/1     Running   0          14m
pod/prometheus-grafana-stack-prometheus-node-exporter-kpn75        1/1     Running   0          14m
pod/prometheus-grafana-stack-prometheus-node-exporter-lpljd        1/1     Running   0          14m
pod/prometheus-grafana-stack-prometheus-node-exporter-qc77l        1/1     Running   0          14m
pod/prometheus-prometheus-grafana-stack-k-prometheus-0             2/2     Running   0          4m13s

NAME                                                        TYPE        CLUSTER-IP      EXTERNAL-IP   PORT(S)                      AGE
service/alertmanager-operated                               ClusterIP   None            <none>        9093/TCP,9094/TCP,9094/UDP   14m
service/prometheus-grafana-stack                            ClusterIP   10.233.16.22    <none>        80/TCP                       14m
service/prometheus-grafana-stack-k-alertmanager             ClusterIP   10.233.15.145   <none>        9093/TCP                     14m
service/prometheus-grafana-stack-k-operator                 ClusterIP   10.233.16.50    <none>        443/TCP                      14m
service/prometheus-grafana-stack-k-prometheus               ClusterIP   10.233.36.172   <none>        9090/TCP                     14m
service/prometheus-grafana-stack-kube-state-metrics         ClusterIP   10.233.52.131   <none>        8080/TCP                     14m
service/prometheus-grafana-stack-prometheus-node-exporter   ClusterIP   10.233.38.211   <none>        9100/TCP                     14m
service/prometheus-operated                                 ClusterIP   None            <none>        9090/TCP                     14m

NAME                                                               DESIRED   CURRENT   READY   UP-TO-DATE   AVAILABLE   NODE SELECTOR   AGE
daemonset.apps/prometheus-grafana-stack-prometheus-node-exporter   6         6         6       6            6           <none>          14m

NAME                                                          READY   UP-TO-DATE   AVAILABLE   AGE
deployment.apps/prometheus-grafana-stack                      1/1     1            1           14m
deployment.apps/prometheus-grafana-stack-k-operator           1/1     1            1           14m
deployment.apps/prometheus-grafana-stack-kube-state-metrics   1/1     1            1           14m

NAME                                                                     DESIRED   CURRENT   READY   AGE
replicaset.apps/prometheus-grafana-stack-698c69b75c                      1         1         1       6m17s
replicaset.apps/prometheus-grafana-stack-dcff94ff                        0         0         0       14m
replicaset.apps/prometheus-grafana-stack-k-operator-5bfff6f46            0         0         0       14m
replicaset.apps/prometheus-grafana-stack-k-operator-7db87bb89d           1         1         1       6m34s
replicaset.apps/prometheus-grafana-stack-kube-state-metrics-5bc94b47cb   1         1         1       5m54s
replicaset.apps/prometheus-grafana-stack-kube-state-metrics-96db4f697    0         0         0       14m

NAME                                                                    READY   AGE
statefulset.apps/alertmanager-prometheus-grafana-stack-k-alertmanager   1/1     14m
statefulset.apps/prometheus-prometheus-grafana-stack-k-prometheus       1/1     14m
[sysadmin@vtq-cicd prometheus]$ kubectl -n monitoring get ingress
NAME                                      CLASS   HOSTS                             ADDRESS         PORTS   AGE
prometheus-grafana-stack                  nginx   grafana.monitor.viettq.com        192.168.10.16   80      14m
prometheus-grafana-stack-k-alertmanager   nginx   alertmanager.monitor.viettq.com   192.168.10.16   80      14m
prometheus-grafana-stack-k-prometheus     nginx   prometheus.monitor.viettq.com     192.168.10.16   80      14m
Như vậy ta đã cài đặt xong bộ Prometheus + Alert Manager + Grafana. Giờ ta thực hiện khai host trên client và kết nối vào web để kiểm tra:
# Edit hostfile, 192.168.10.10 là IP của Load Balancer, chính là VIP của các node k8s-master
#monitoring
192.168.10.10 rancher.monitor.viettq.com
192.168.10.10 prometheus.monitor.viettq.com
192.168.10.10 grafana.monitor.viettq.com
192.168.10.10 alertmanager.monitor.viettq.com
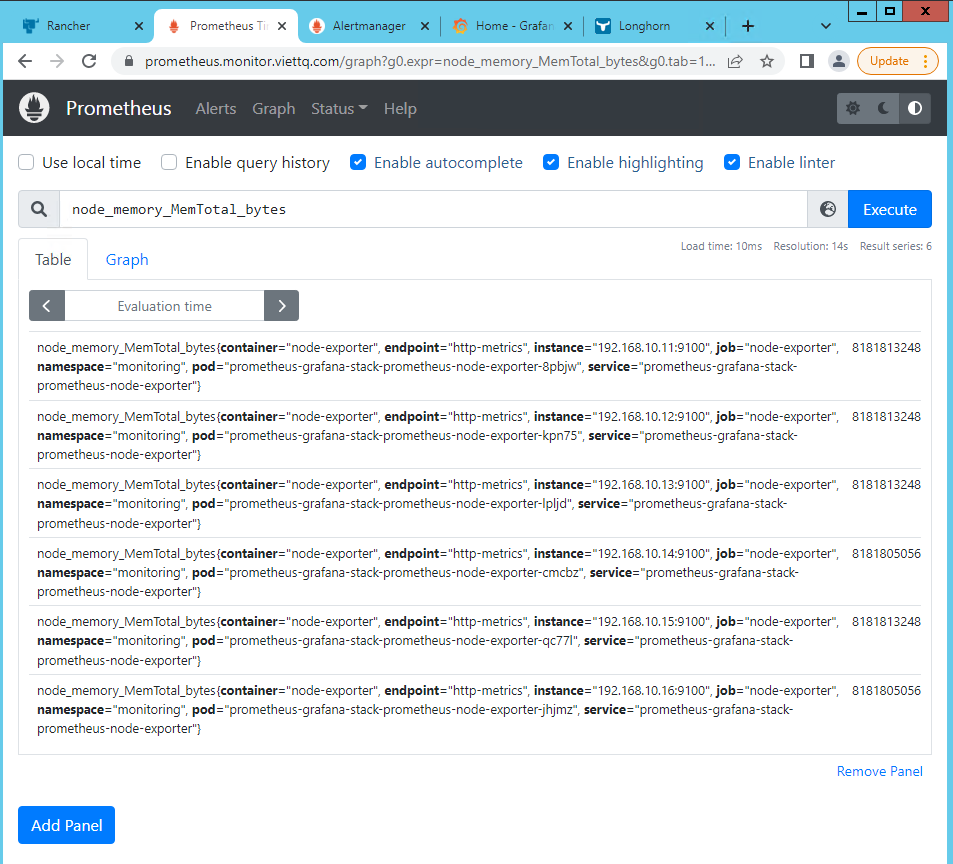
Giao diện của Prometheus, xem thông tin "node_memory_MemTotal_bytes" của các node:
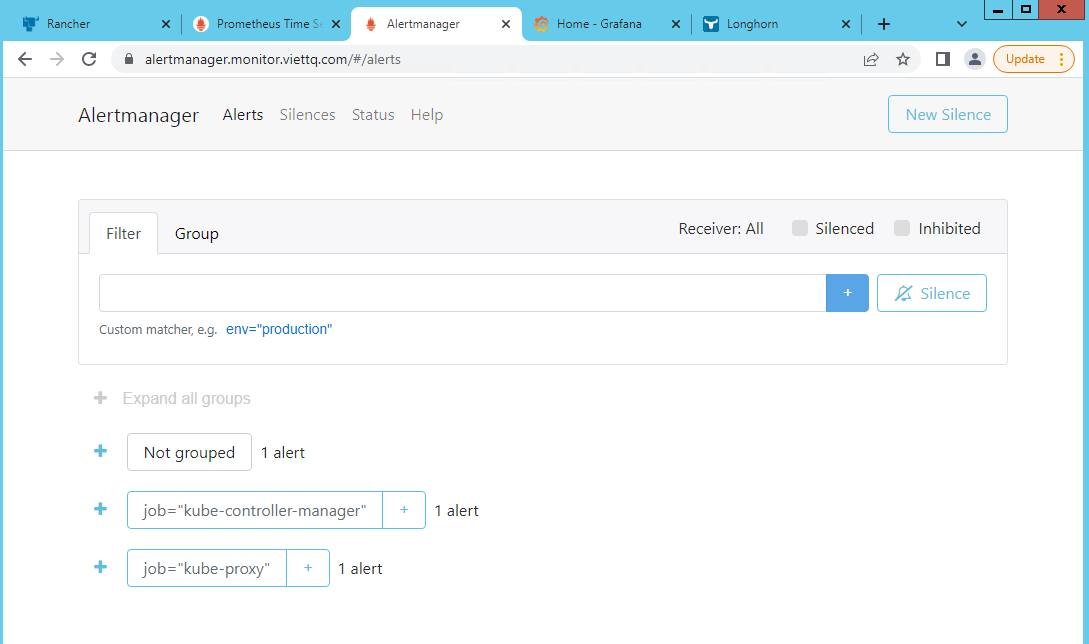
Kiểm tra kết nối vào Alert Manager:
Kiểm tra kết nối vào Grafana
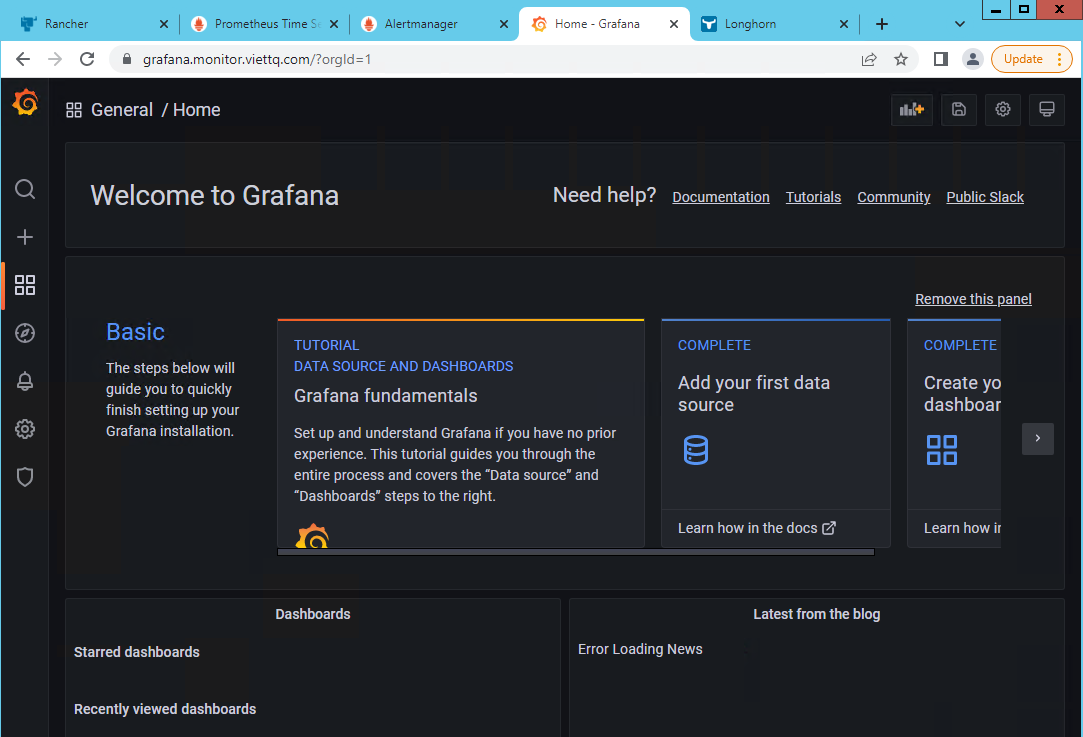
Lúc này bạn đã cài đặt xong bộ công Prometheus/AlertManager/Grafana và các kèm với đó là các Node Exporter của K8S. Giờ là lúc dùng các thông tin metric lấy được từ Prometheus để hiển thị lên Grafana.
Các dashboard trên grafana các bạn có thể dễ dàng tìm được các bộ template có sẵn, ví dụ dashboard giám sát Kubernetes thì có thể tìm google với từ khóa grafana k8s node dashboard sẽ ra một loạt các template cho bạn lựa chọn, ví dụ như template này:
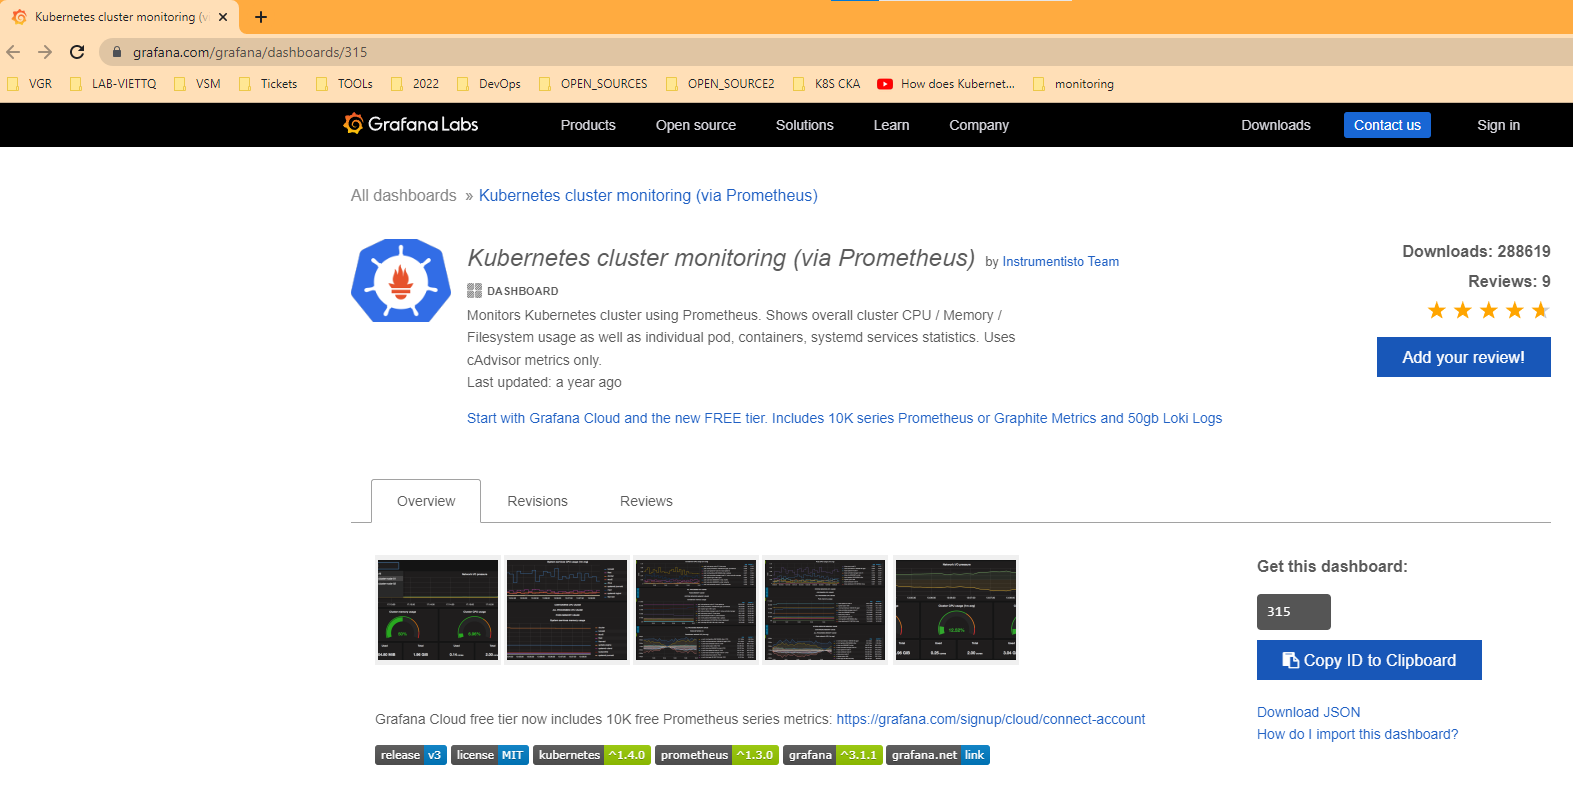
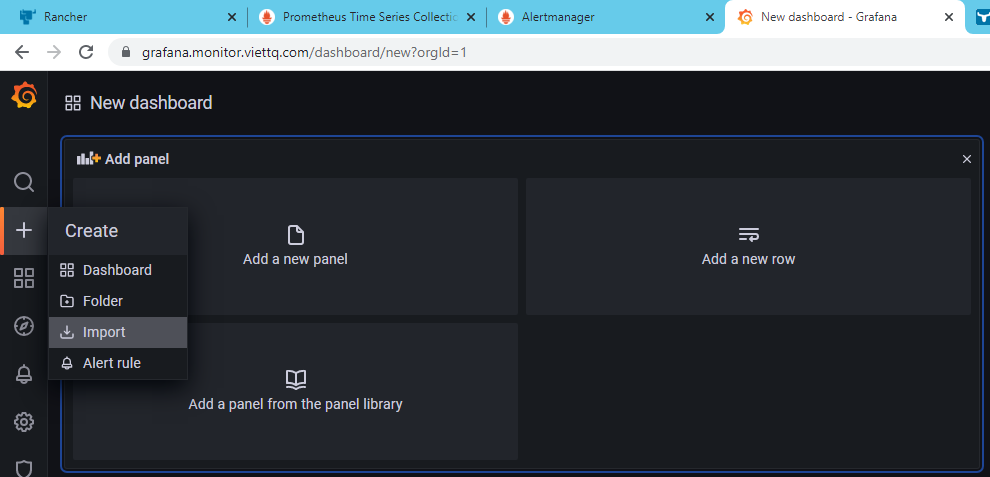
Bạn copy id của dashboard này là 315 và import và Grafana của bạn bằng cách chọn Create --> Import --> Nhập ID là 315 và ấn Load.
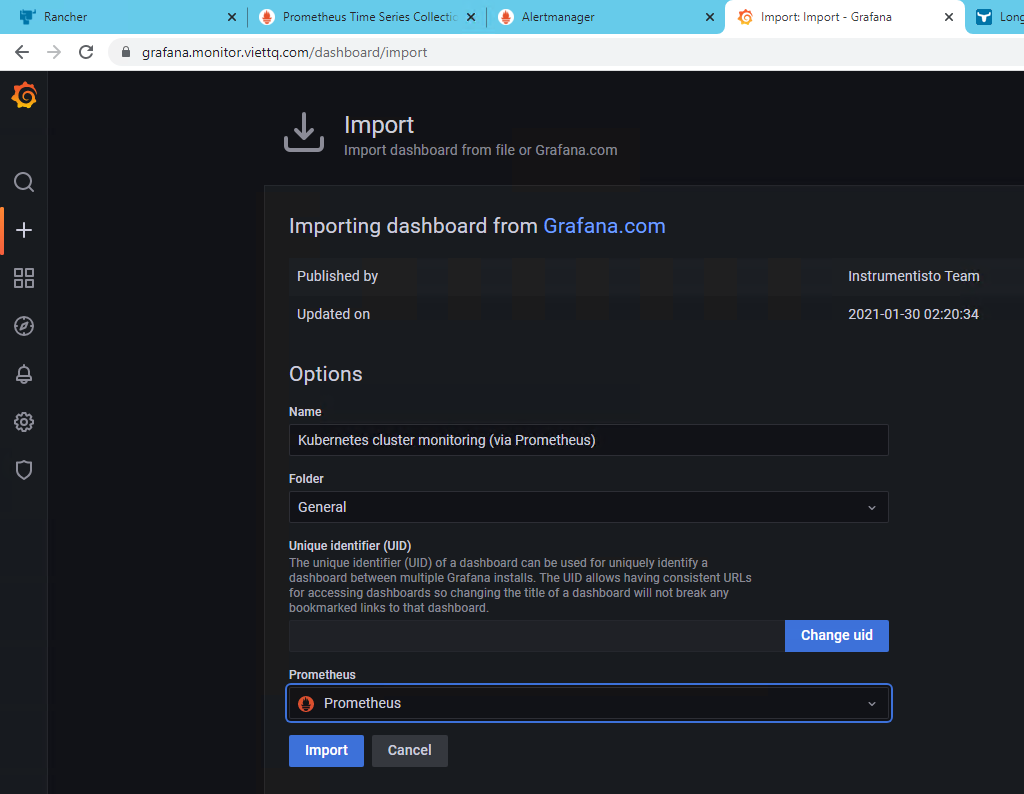
Lúc này cần chọn tên cho Dashboard và thư mục lưu Dashboard này. Trong phần thông tin prometheus thì lựa chọn Prometheus và chọn Import:
Import xong thì thưởng thức kết quả thôi, lại có ảnh đẹp để đi lòe thiên hạ rồi 
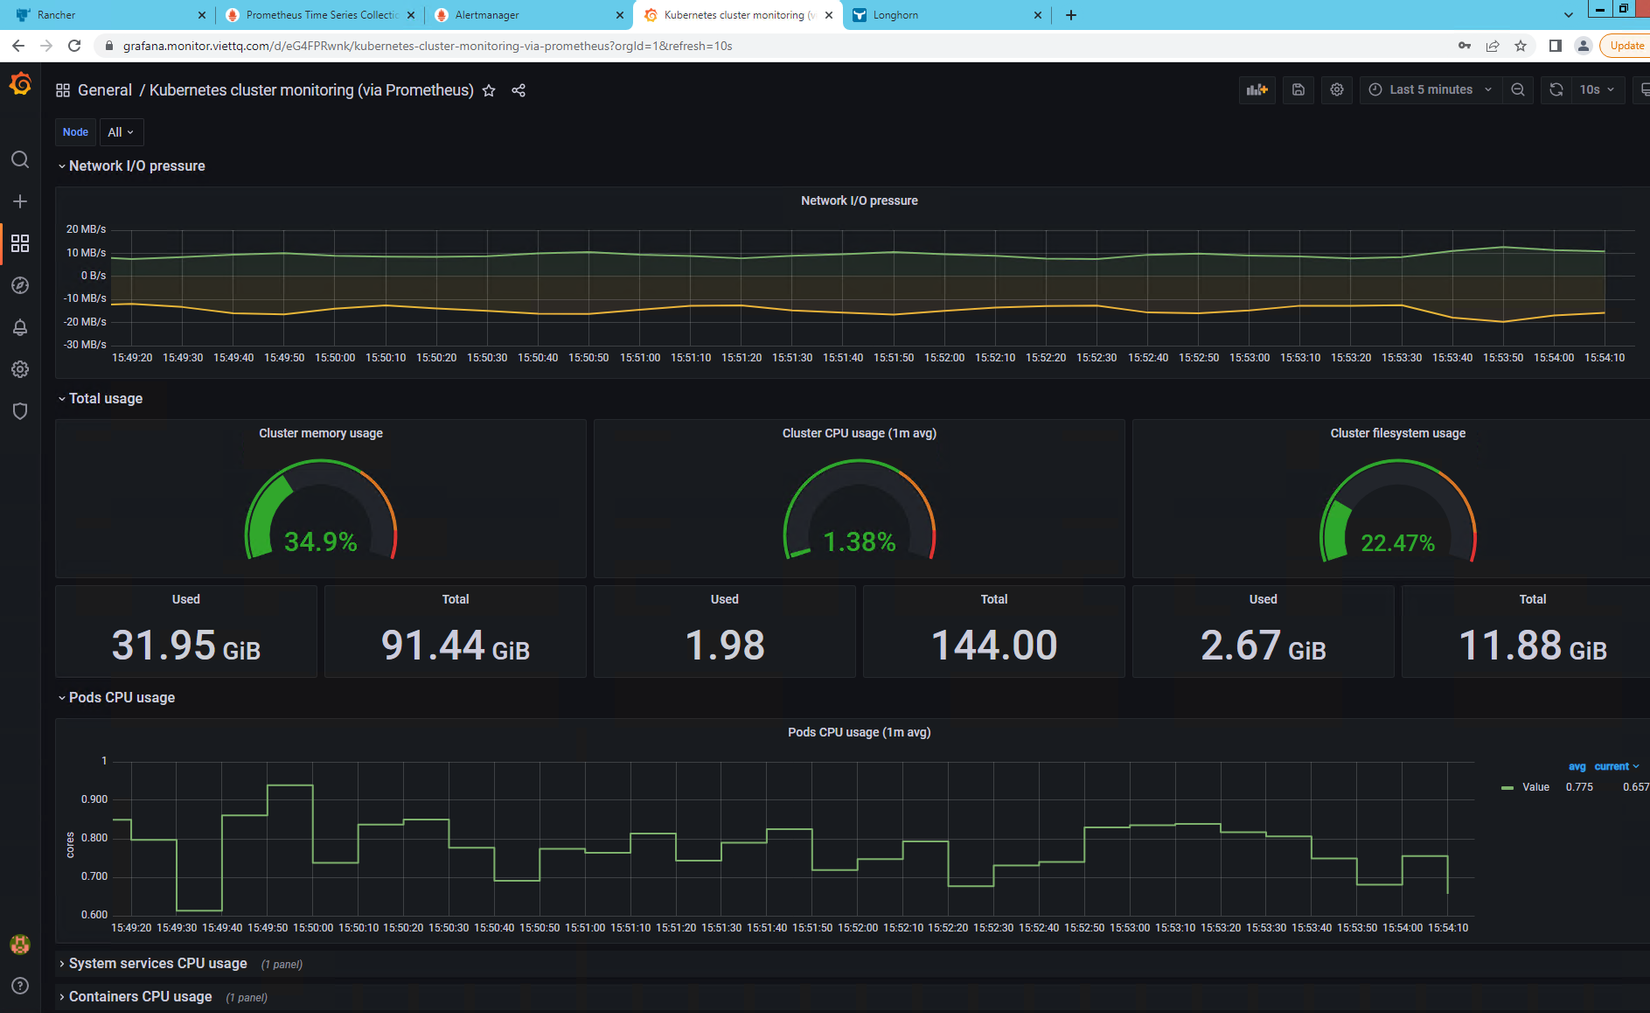
Giám sát service trên K8S bằng Prometheus và Grafana
Sau khi cài tới đây thì cơ bản lấy được thông tin của K8S và hiển thị dc lên dashboard của Grafana.
Vậy khi bạn cài một ứng dụng khác lên k8s thì việc cài đặt để lấy dữ liệu của nó và hiển thị lên dashboard sẽ như thế nào? Mình sẽ làm mẫu với việc cài dịch vụ Minio lên K8S và lấy metric của nó qua Prometheus và hiển thị lên dashboard của Grafana.
Ý tưởng là cài Minio lên k8s (bạn nào chưa biết về Minio thì google thêm nhé, nó cũng khá phổ biến với ai hay dùng open-source). Sau đó cấu hình cho nó expose metric của nó, vì khá nhiều opensource hỗ trợ sẵn metric mà Prometheus có thể hiểu được.
Sau đó cấu hình scrape-config của Prometheus để chọc vào Minio lấy metric. Cuối cùng là lên mạng tìm một dashboad template của Minio import vào Grafana là xong.
Cài đặt Minio
Mình sẽ cài Minio bằng helmchart:
helm repo add bitnami https://charts.bitnami.com/bitnami
helm search repo minio
helm pull bitnami/minio --version=11.2.10
tar -xzf minio-11.2.10.tgz
cp minio/values.yaml  values-minio.yaml
Giờ thì sửa vài tham số cơ bản ở file values-minio.yaml để chạy nó lên gồm enable ingress, gán pvc dung lượng 1Gi và khai báo storageclass:
rootPassword: RX5CvM9NGPHRH3WBaDjKdfuSW2SKadsF
enabled: true
hostname: minio2.monitor.viettq.com
   annotations:
     prometheus.io/scrape: 'true'
storageClass: longhorn-storage-retain
size: 1Gi
Lưu ý storageClass cần khai đúng storage class bạn đang cài trên k8s nhé. Các bạn có thể tham khảo cách cài storage trên k8s ở bài viết cũ trong series này của mình: https://viblo.asia/p/k8s-phan-4-cai-dat-storage-cho-k8s-dung-longhorn-1Je5EAv45nL Tiếp theo mình sẽ tạo namespace riêng để cài minio:
kubectl create ns viettq-prod
helm -n viettq-prod install minio -f values-minio-standalone.yaml minio
Phần cấu hình loadbalancing mình đã cài đặt từ trước, nên giờ chỉ cần khai hostname ở client và kết nối vào là được:
192.168.10.10 minio2.monitor.viettq.com
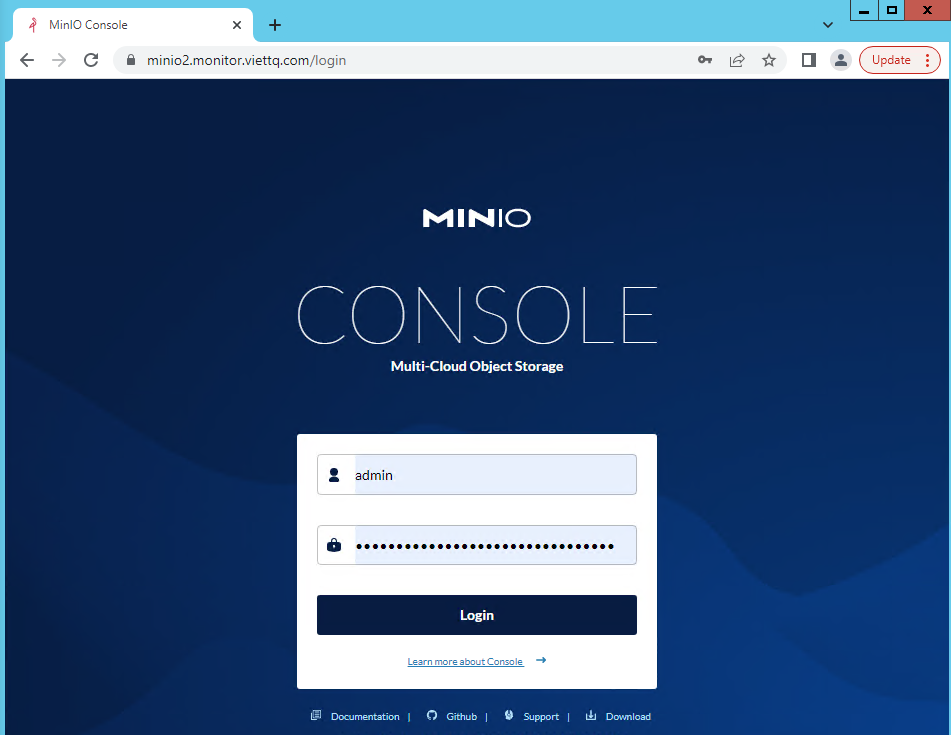
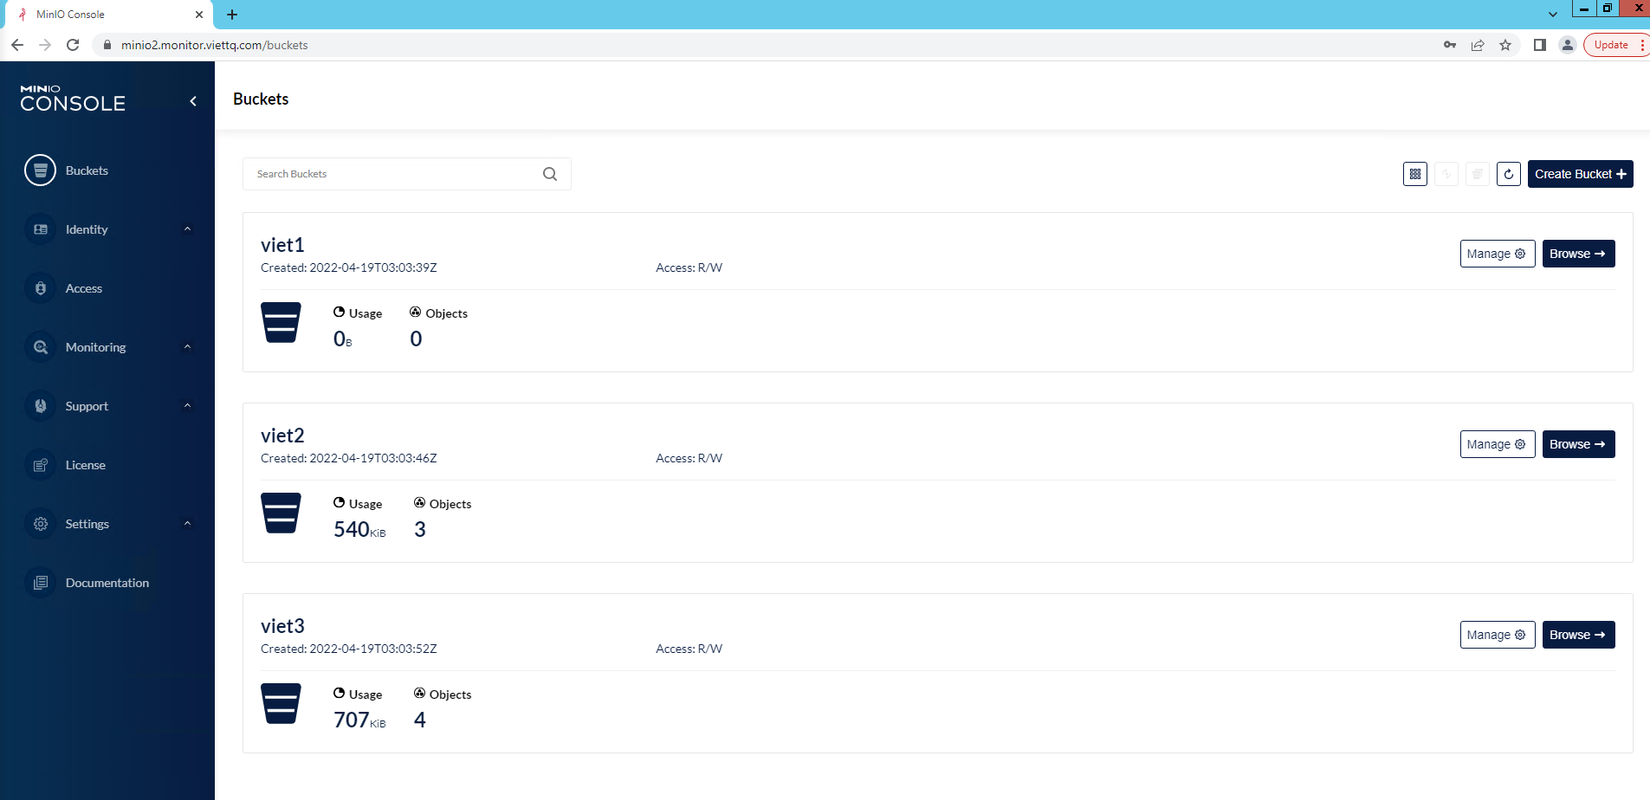
Đăng nhập vào bằng user admin và pass như cấu hình bên trên. Mình tạo ra 3 bucket để lát check tham số giám sát trên Grafana có chính xác không:
Tiếp đến bạn lưu ý trong file values-minio.yaml bên trên có tham số "path: /minio/v2/metrics/cluster" đó là địa chỉ minio expose metrics của nó ra, mình sẽ dùng để cấu hình cho Prometheus
Cấu hình Prometheus lấy dữ liệu từ Minio
Quay lại thư mục cài đặt Prometheus ban đầu, ta sẽ sửa lại file values-prometheus.yaml để update phần scrape-config cho minio như sau:
    additionalScrapeConfigs:
     - job_name: minio-job
       metrics_path: /minio/v2/metrics/cluster
       scheme: http
       static_configs:
       - targets: ['minio.viettq-prod.svc.cluster.local:9000']
Trong đó:
- metric_path: Chính là đường dẫn được cấu hình ở minio để expose metrics
- targets: Hiểu đơn là khai báo IP/Port để kết nối tới địa chỉ expose metrics. Ở đây mình điền service name của Minio và port của nó. Do Prometheus và Minio đang được cài ở 2 namespace khác nhau nên mình phải đặt service name ở dạng full theo format: <service-name>.<namespace>.svc.<cluster-name> trong đó cluster name đang set là "cluster.local"
Tiếp theo phải update lại Prometheus để nó cập nhật value mình vừa thay đổi:
helm -n monitoring upgrade prometheus-grafana-stack -f values-prometheus-clusterIP.yaml kube-prometheus-stack
Chờ chút để update rồi vào lại web prometheus kiểm tra trong phần target xem đã có của Minio hay chưa:

Như vậy là mình đã cấu hình cho Prometheus lấy được dữ liệu metrics của Minio rồi. Tiếp theo là hiển thị lên dashboard nữa.
Hiển thị metrics của Minio lên Grafana dashboard
Mình sẽ lên mạng tìm template dashboard cho minio để dùng cho nhanh (thay vì ngồi set từng tham số chắc đến mùa quít). Keyword search là "grafana minio dashboard" và mình tìm dc một dashboard ID là 13502 (tham khảo: https://grafana.com/grafana/dashboards/13502)
Giờ mình sẽ import dashboard này lên Grafana và xem kết quả:
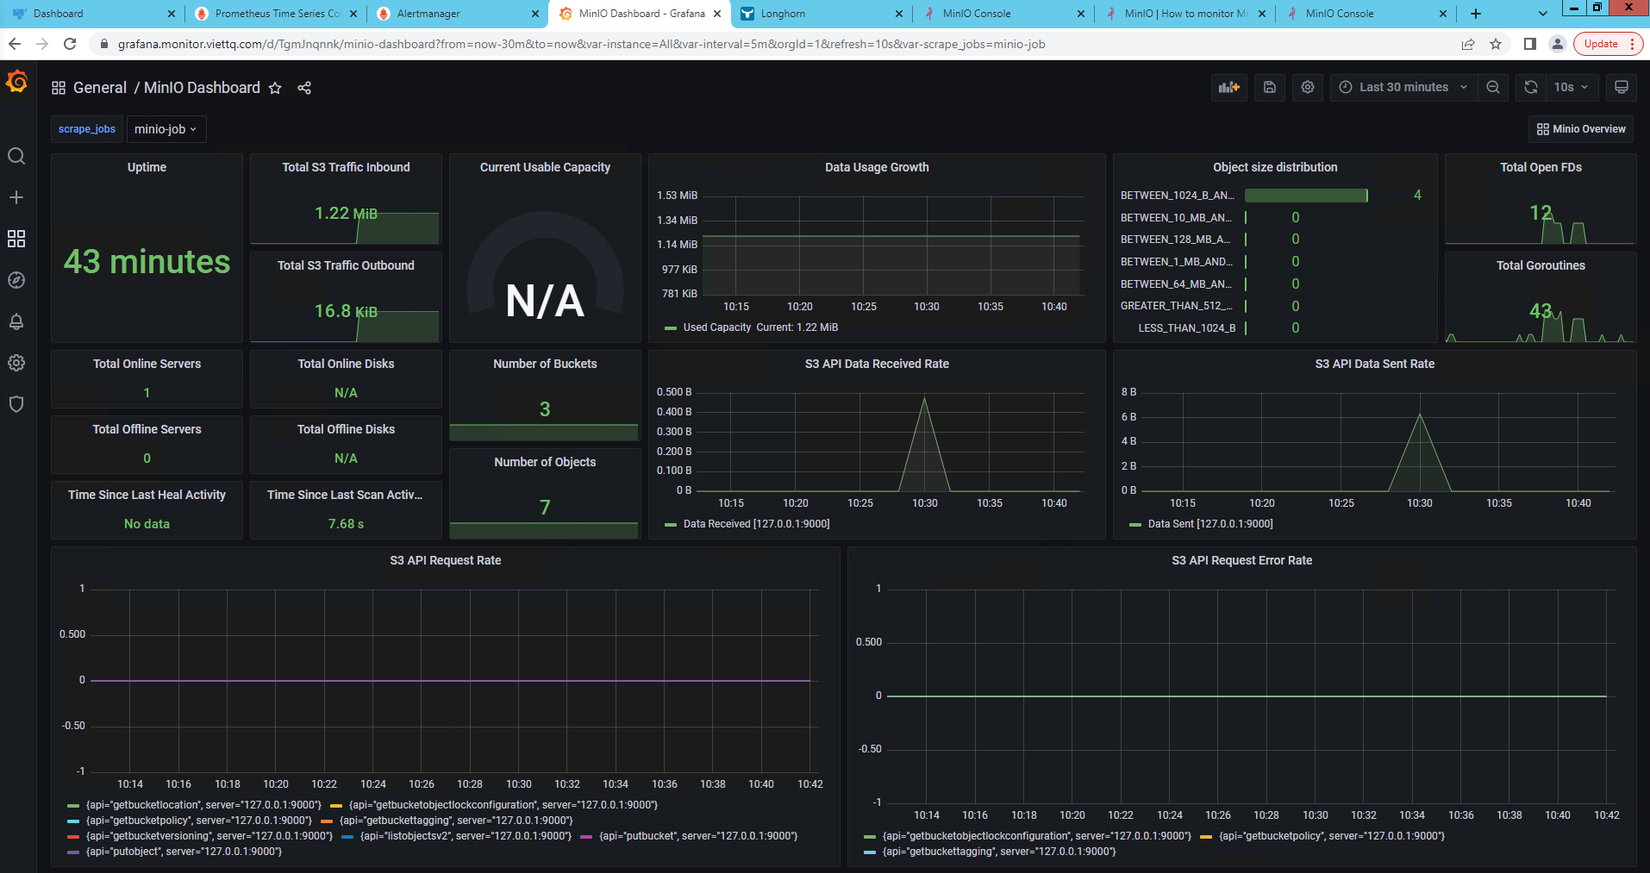
Như vậy là các thông số của Minio đã được hiển thị lên dashboard. Có thể thấy nhanh tham số Number of Bukets đang là 3, đúng với số lượng bucket mình đã tạo.
Cấu hình cảnh báo qua Alert Manager
Mình sẽ tạo thêm cấu hình rule alert cho Minio với tham số đơn giản là số lượng file của 1 bucket nếu lớn hơn 1 thì sẽ có cảnh báo (để demo cho các bạn, còn tùy biến theo nhu cầu thực thế thì các bạn tự tìm hiểu thêm nhé).
Tiếp tục sửa value khi cài đặt, thêm rule cảnh báo như sau:
# additionalPrometheusRules: []
additionalPrometheusRules:
  - name: minio-rule-file
    groups:
    - name: minio-rule
      rules:
      - alert: MinioBucketUsage
        expr: minio_bucket_usage_object_total{bucket="viet3", instance="minio.viettq-prod.svc.cluster.local:9000", job="minio-job"} > 1
        for: 10s
        labels:
          severity: page
        annotations:
          summary: High bucket usage
Mô tả: Rule trên thực hiện theo dõi bucket viet3 nếu có số lượng object > 1 trong 10s thì sinh cảnh báo.
Giờ lại update lại Prometheus để cập nhật thay đổi:
helm -n monitoring upgrade prometheus-grafana-stack -f values-prometheus-clusterIP.yaml kube-prometheus-stack
Chờ chút để update rồi vào lại web prometheus kiểm tra trong phần Alert xem đã có của Minio hay chưa:
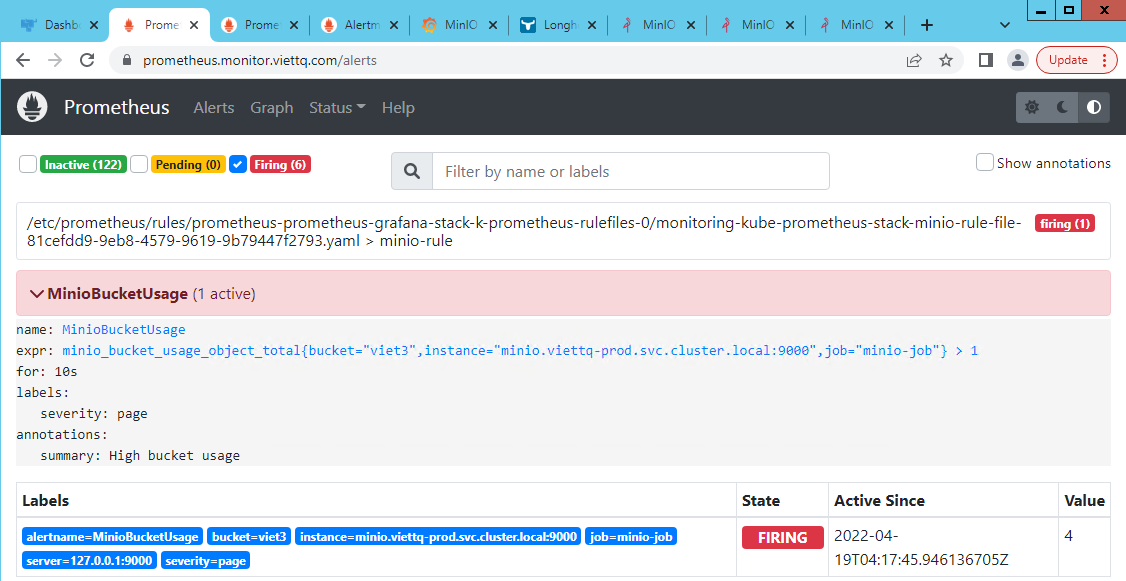
Như vậy trong bucket này đang có 4 file (Value đang là 4) do đó Prometheus đã sinh ra cảnh báo. Tiếp tục vào Alert Manager kiểm tra cảnh báo, filter bằng job="minio-job" để lọc đúng cảnh báo cần tìm:
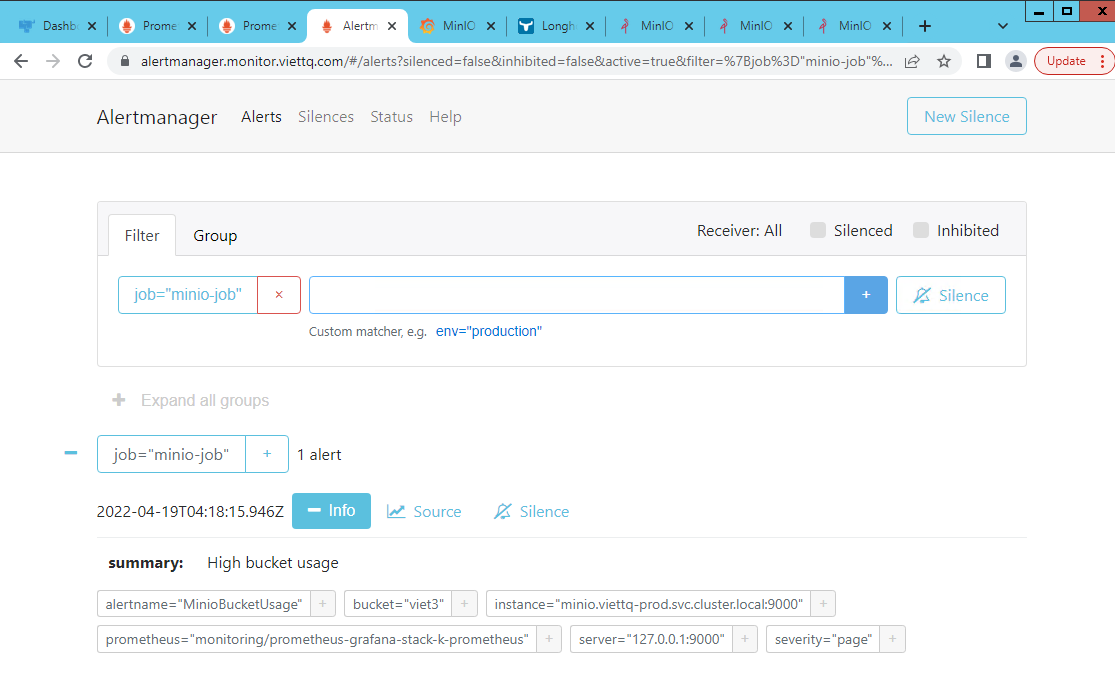
Như vậy là luồng cảnh báo đã thông, các bạn có thể cấu hình để Alert Manager gửi cảnh báo qua Telegram hay Email..
Qua bài viết này hy vọng các bạn sẽ hiểu được Prometheus/Grafana là gì và ý tưởng của nó trong việc giám sát và trực quan hóa các thông tin hoạt động của dịch vụ trên K8S.
Hy vọng từ những chia sẽ này, các bạn có thể áp dụng để cài đặt và sử dụng được, cũng như tích hợp giám sát nhiều dịch vụ khác nữa mà các bạn đang quản lý.
Cảm ơn vì đã đọc tới đây vì bài viết hơi dài! Hẹn gặp lại các bạn ở phần tiếp theo 
All Rights Reserved
